Send Modelur Data to Excel (Windows only)
To send data to excel, go to Extensions Menu > Modelur > Send data to Excel. Once you click on this button, Modelur will open up Excel (it should already be installed on your Windows OS) and populate it with the data from Urban Control Data Table. New XLSX file will have the same name as your SKP file and will be saved next to it.
Once connection to Excel is established, Modelur will send updated data whenever you make a change to your model. By default, Modelur will create and XLSX file with one tab, named Modelur Live Data. In order for Modelur to recognize this tab in the future (once saved and reopened), make sure not to rename this tab.
After XLSX file is populated with values from Modelur, you can add your own sheet and refer to it (and its cells) to add your own calculations and graphs.
Setting the data that is sent to Excel
The data that is sent to Excel is the same as the data that you see in Urban Control Data Table. In case you want to change which data is being sent to Excel, you can do so there by (un)checking appropriate checkboxes.
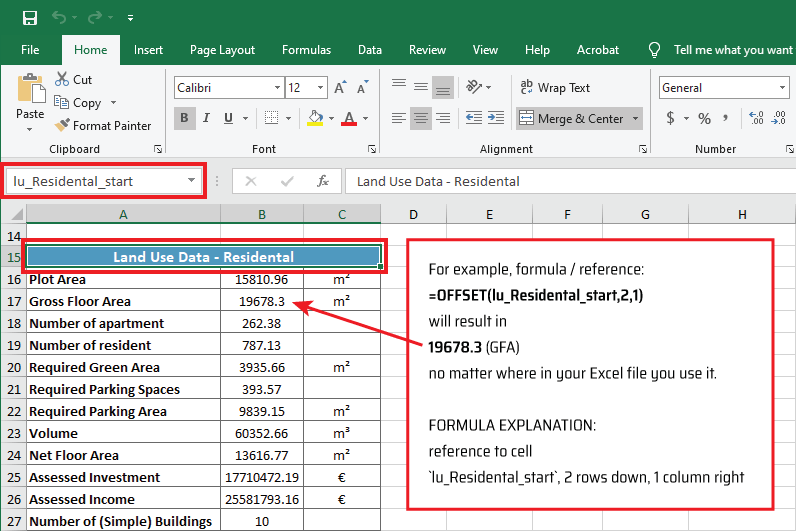
When you add new Modelur objects (Land Uses, Buildings or City Blocks), Excel rows usually change. To overcome problem of referencing wrong data in your formulas when rows change, Modelur adds named cells to exported data labels so you can reference specific values based on their names.
Extracting range of data to another sheet using named cells
If you wish to use only specific section of the data (eg. Simple Buildings Data) in your separate sheet, you can use Excel’s Array Formula by selecting mupltiple cells that will hold the data, enter range formula =bu_start:bu_end and confirm it using Ctrl+Shift+Enter.